Showing posts with label My Quilts. Show all posts

Thursday, May 10, 2012

My First Quilt


Scrappy Squares, 1989
Well, here it is.  The very first quilt I ever made.  I don't remember exactly when I started it or how long it took me to make, but I do know that I finished it in 1989 -- the same year I graduated from high school.
I was inspired by the children's book The Patchwork Quilt by Valerie Fluornoy, which was featured on the PBS show "Reading Rainbow."  It is a story about an African American girl and her family.  The little girl's grandmother lives with them and teaches her how to make a quilt using all sorts of scraps from their old clothes. It takes the little girl, her grandmother, and her mother an entire year to make the quilt.  When it is completed, the whole family reflects on the year gone by and the memories that each patch holds for each family member.
This is what sparked my interest and made me dig out a box of scrap fabrics and start sorting it out, cutting it up, and stitching it together!

The overall size of this quilt is approximately 52.5" x 85".  Each square is 4" (finished) and hand-cut by me using a pair of scissors and a cardboard template that I made.  This was before the advent of rotary cutters and rulers (at least before I knew about their existence).
Notice my attempt at a border -- I alternated the same two fabrics all the way around.  The only fabric I purchased for this quilt was the backing (which was an inexpensive sheet I bought at K-Mart -- something I would NEVER do today).
All of the fabrics on the top came from a hand-me-down fabric stash.  This was a cardboard box full of my great-grandmother's scrap fabric, plus some scrap stuff my mom had laying around the house.
Gram's favorite color was blue.  Hence, the overabundance of blue in this quilt.  She worked as a seamstress at a garment factory in Boston, so she had a lot of fabric laying around.  Some of the flowery fabrics were still in the shape of skirt pockets when I received them -- remnants from the factory assembly line.

These fabrics always make me think of Gram, especially that darker blue one near the bottom right. It looks like flowers and blueberries. It reminds me of a dress she used to wear that was made of similar fabric.
Germaine, 1914
Here is my great-grandmother, Gram.  I'm sure she made this dress she is wearing. She was about 17 or 18 years old in this picture.  She was born in Belgium in 1895.  This was around the time she immigrated to Boston in 1914 (I think?).

 
And here she is in a fancier outfit.  Her name was Germaine (my mother's maternal grandmother).  She lived to the age of 93, passing away in February, 1989.  She was always a very sweet and loving great-grandmother to me and my siblings.
Below, are two close-ups of my quilting and proof positive that I had no idea what I was doing.  The purpose of the quilting stitches is to keep the three layers of the quilt together -- the top, batting, and backing -- and to keep the batting from clumping and shifting as the quilt is used and washed.  I understood all of that, but what perplexed me was how to accomplish all this quilting without having unsightly knots showing on the back of the quilt.


My solution (with some guidance from my mother who also knew very little about quilting) was to go ahead and do all the quilting with the knots showing on the back.  Then add a second layer of backing to cover all the knots.  I kept this additional layer in place by tying knots with embroidery thread in each corner of the squares.
 
If you look at these pictures, you should be able to see the white stitches that outline each square.  I did those all by hand.  Then after I added the second layer of backing, I tied the blue knots that you can see (barely visible) in the corners of each square.  The blue knots go all the way through the top, batting, first backing and second backing.
I used the "punch and stab" method, which is just what it sounds like.  You punch the needle down through the top, pull it through from the back, then stab it up again from behind -- very tedious and not all that efficient.
I also didn't know much about thread either.  My mom had told me that quilting thread is thicker than regular thread.  So, I went to the store and bought this thread that is actually intended for crocheting!  You can probably tell by looking at the picture that it was pretty thick.  I had to use a really large-eye needle to even get it threaded.

This is the cat fabric that my mother had chosen as a girl for Gram to make her a dress out of.  For one reason or another, the dress was never made, and I have now inherited about two yards of this fabric.
 Yes, that's a guy on a trapeze and Christmas ornaments to the bottom left of him!  Notice that not only are there no borders on this quilt, but there is also no binding.  For any non-quilters reading this, the binding is supposed to go around the entire edge to finish off the quilt.  
When I sewed that second back on, I simply put it right sides together with the top, sewing all the way around and leaving a small opening to "turn" it right side out.  Then I stitched the opening closed by hand.  Not an entirely unusual way to finish a quilt but certainly not the preferred method by most quilters.


So, lots of mistakes, but you have to start somewhere.  At least I knew, even back then, how important it is to sign and date your work!

Tuesday, May 8, 2012

Daisy Wall Hanging

Everything's Coming Up Daisies, 2000

I called this one "Everything's Coming Up Daisies."  I'm not exactly sure when I started this, but I finished it in 2000.  The overall size of this is 26 1/2" x 38."  This actually started out as a quilt kit that I purchased at a quilt show -- "Buffalo Flowers" by P & B Textiles.  It came with the fabrics seen here on the front and a pattern.  I didn't care for the shape of the flower heads in the original pattern, so I changed it to a daisy design instead.  I also added some three-dimensional elements to my quilt which are not part of the original design.


This entire quilt is hand sewn.  I believe this is also the first quilt in which I used hand applique.  It was after making this quilt that I realized how much I enjoyed doing handwork.  I have since found ways to incorporate handwork into many of my other projects.

Tuesday, April 24, 2012

Hexagon Update

Between all of the projects I have recently completed, I have continued plugging away at my hexagon quilt.  It's been a year since I have stopped to document my progress, so I thought today would be a good day to lay it all out again and take a look.  

This quilt is pieced entirely by hand.  If you are curious as to how this is constructed, or want to view my progress from the beginning of this project, be sure to check out my Hexagon Tutorial and Hexagon Progress blog posts.

So far, I have 22 flower units sewed together (rows 1, 2 & 3 are done)!  All but 11 flower units have their muslin hexagons sewn on and I have prepared many more green hexagons (I stopped keeping track of the number a while back).


It's really starting to come together now!  I still have not decided exactly how I am going to finish this off -- what the backing will be, how I will handle the binding, borders (if any), etc.  I figure I still have plenty of time to think about it!


Wednesday, November 23, 2011

A Few of His Favorite Things

Yesterday was an exciting day because I finally finished the latest quilt I have been working on for my son.  I started it almost two years ago, worked on it for a while, then put it aside for many months before picking it back up this fall and finishing it.

Here are the start-to-finish pictures I took as I documented my progress.


The first pictures I took were when I was trying to establish the layout of all the blocks.  I carefully chose fabrics with pictures of things my son really likes -- trucks, cars, trains, bugs, Peanuts, and other cute images.  Some of these fabrics I had in my stash, while others I went out and purchased especially for this quilt.


Next I "fussy cut" images from the fabrics and chose brightly colored prints from my stash to make borders around each image.  The trickiest part here was dealing with all the different sizes of the center pieces on these blocks.

To deal with that, I just decided on a finished block size (in this case, 8") and then cut the border pieces whatever size I needed to make the blocks 8 1/2" (this included the necessary 1/2" seam allowance).  I actually made all the blocks slightly larger than 8 1/2" so that I could trim them to exactly 8 1/2" with my rotary cutter and ruler -- just more accurate that way.


As I worked on this, I tried to keep it layed out on the floor, so that I could make the right color selections for each block.  I didn't want to end up with blocks of the same color adjacent to one another.  I also didn't want to end up with clusters of similar colors -- like too many red, orange, and yellow blocks placed together.


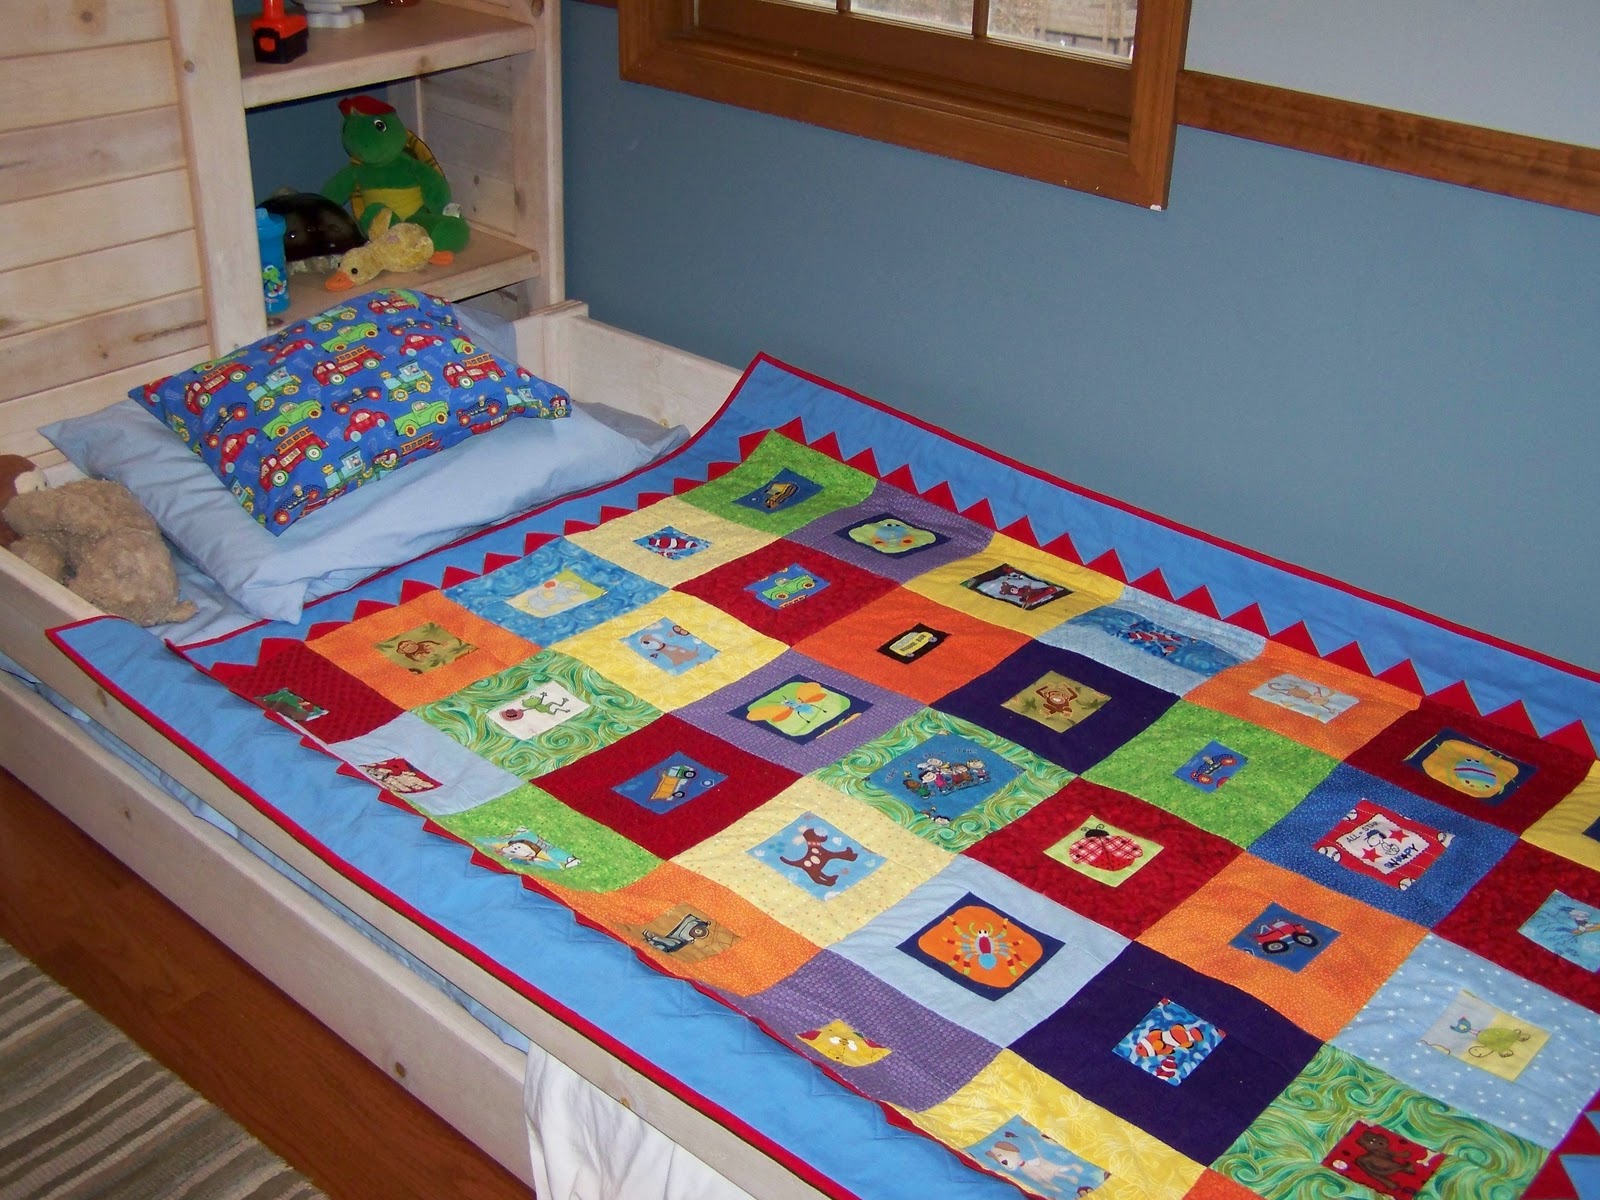
Once I pieced all the blocks, I began working on the border design.  I decided I wanted to try something a little different than the typical plain border.  So, I decided to try doing these prairie points.  They are really just squares of fabric folded and then inserted into the seam between the quilt and the border.


This is where I was just laying out the triangles to see if I liked them against the blue border.  I was also trying to determine how wide I wanted to cut that blue border strip.


Here is the finished quilt on my son's bed (he is 3 years old) and a matching pillow that I made for him.  It's hard to see the quilting in this, but it IS quilted.  I machine quilted in the ditch around each block and center image.  I also quilted around each prairie point in the blue border.  I'm still working on perfecting my machine quilting skills.  For the most part, I am a hand quilter.  As I'm making more quilts though, I have been trying to work on improving my machine quilting.  Without a long arm quilting machine, I find it a rather challenging task.


Thanks to a nice woman in my quilt guild, I made this very practical and cute backing out of my leftovers.  All of these fabrics were used somewhere on the front of the quilt.  And there is my son rolling around on his new quilt!


Sprawled out on his new quilt!  Now all I have left to do is add a label!

Wednesday, October 12, 2011

Sailboat Quilt


This was my first "commissioned" quilt.  I designed this with the help of a good friend who wanted me to make something for her son's "big boy" bed.


I used EQ to design and plan it out.  The quilt is machine pieced and quilted.  I did all of the piecing.  Then we took it to someone I know who does machine quilting on a longarm machine, and she did all the quilting.  It was completed in February, 2011.


Here is the label -- a fish that I hand appliqued on the back.  (I chose not to show a close-up photo here to protect the privacy of my friend's name), which is on the label.

Saturday, October 8, 2011

Tablerunner


This is a tablerunner I made for my mother-in-law's birthday in March, 2010.  I used Electric Quilt to help me plan this out.  I did not purchase any fabrics for this quilt.  I made it entirely with fabrics already on hand.


I machine pieced and quilted this one. Start-to-finish I think it took me about a week to make this. I procrastinated getting this going, mainly because I was working on my friend's sailboat quilt, so I was kind of in marathon mode when I made this.


If I decide to make another one of these, I would like to make it a little longer.  I also think I would change the yellow pieced border to one that is not pieced.  That would make it a little quicker to put together, and I don't think the pieced border is necessary to the overall design anyways.  This tablerunner would look good in many different colorways, and might make nice gifts for the holidays.  I just might make a few more!

Friday, October 7, 2011

Name Banner Quilts


I came up with the idea for this wall hanging after finishing an alphabet quilt for my son.  I have made three of these so far.  I used the same letter templates for this as the alphabet quilt.  I used hand applique for the letters and hearts, and I did hand quilting around each letter and heart.  All of the fabrics in this wall hanging are the same as ones used in the alphabet quilt.


This one hangs in my daughter's room.  This is also hand appliqued and hand quilted.  The daisy template is from EQ.  I am hoping to make a bed quilt for her in the future that will include some of these same fabrics and maybe the flowers too.  I'm still working on designing that one.

Thursday, October 6, 2011

Family Picnic Quilt

Family Picnic, 2009
Here is our family picnic blanket that I made in 2009. This is the first quilt I designed and made utilizing my Electric Quilt software.  I made this quilt in about a week (start to finish).  It is entirely machine pieced and quilted.  This quilt is made up of 5 1/2" squares and measures approximately 80" square.  I wanted to make a blanket large enough for my 6'2" husband.  I found that most pre-made picnic blankets are far too small for my liking.  I mean really, what good is a picnic blanket if the whole family can't fit on it at the same time?

When I made this quilt, I was very motivated to make something quick, easy, and durable.  I knew this would get a lot of love (read "wear and tear"), so I didn't want anything fancy or fussy that I would worry about "ruining."  So far, this quilt has been puked on, drooled on, pooped on (by children and wildlife), spilled on, and otherwise abused.  It's holding up pretty well so far.  It HAS faded a bit, but that's to be expected since I have it in the sun almost every time we use it.  Most of the time, I keep this quilt in my car.  It comes in handy for the spontaneous outing and also can be used in winter if we should happen to become "stuck" somewhere when it's cold out.


Here is a close-up of the center square of the quilt.  The writing was supposed to be on the inside part of the flap, but I made a mistake and it ended up being on the top outside part of the flap instead!


The center square opens to reveal this hole, which I designed for a beach umbrella pole!  Honestly, I don't know why anyone else hasn't thought of this yet.


And here's a picture of my daughter in July of that year.  She found the hole and the umbrella pole quite interesting!


And my husband with the children enjoying a picnic at the park on our new family picnic blanket!

Wednesday, October 5, 2011

Autumn Stars & Stripes Quilt


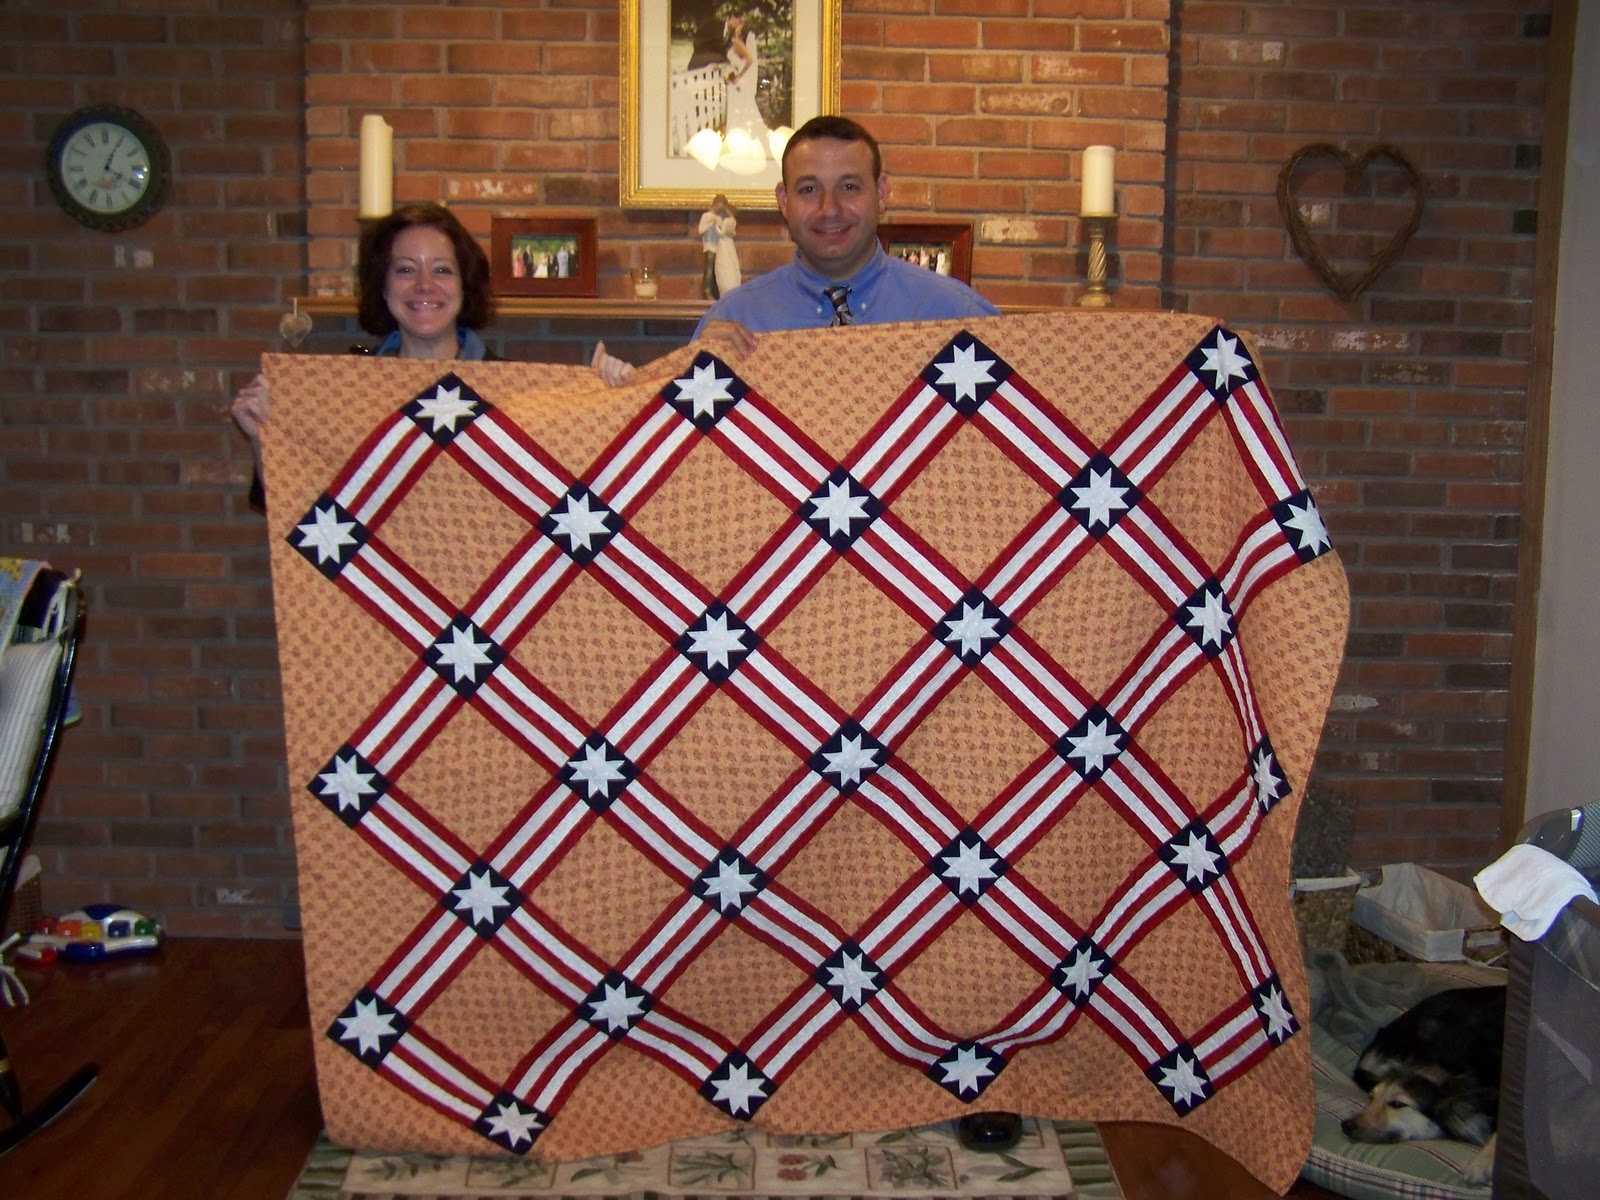
This is my brother and sister-in-law with the quilt I made for their wedding gift (2007).  This was a pattern I found in one of my magazines or books (I can't remember).  He loves the patriotic theme, she loves autumn colors, so I thought it was a good design for them.


Here's a close-up of the design.  It was a pretty simple pattern to do.  I think the hardest part was picking out the right fabrics.  There are three different reds and three different whites used.  I had to also find the right shade of blue for the star blocks.


Here it is again in the vertacle position.  I don't have any other pictures of this quilt or close-ups of the quilting.  I sent it out to a professional quilter and she did custom quilting on it.  She outlined all the stars and quilted a leaf design in the large open areas.  It came out really nice.

I guess one of the things I can say I learned making this quilt is that it is much easier to keep nice sharp points on a star block if it is "floating" on its background.  If you look at the close-up photo, you can see what I'm talking about.  This pattern was designed so that the points of the stars do not come right up to the edge of the seams where the dark blue meets the other fabrics.  There is a little "wiggle room" worked into the pattern, which makes it a LOT easier to make sure those points don't disappear into the seams.

Now that I am cataloging all my quilts in this blog, I have also learned how important it is to take a lot of pictures of the quilts I give away BEFORE they leave my house.  Unfortunately, I have given away a lot of quilts that I have minimal, if any, pictures of.  The pictures I do have are typically of the top and that is all -- no close-ups and no pictures of the backs or labels.  One of these days, I may ask my family to gather up the quilts I have given to them and, armed with my camera, take lots of pictures!

Tuesday, October 4, 2011

Snoopy Stars Baby Quilt

Snoopy Stars, 2007

Diane with the quilt at her baby shower.

I made this for my friend Diane's son Hayden when he was born in 2007. These aren't the greatest photos, but they're all I have.


This quilt is machine pieced and machine quilted. I think this is the first quilt I tried machine quilting on. Each star block is 12" x 12". There are twelve different Peanuts fabrics used in the center of each one. All of the solid fabrics, with the exception of the white, are flannels.  The backing is also flannel.  I do not have a photo of it, but it is a Peanuts-themed fabric as well.


Lesson learned from this quilt: When working with flannels, prewashing fabrics once is not enough, especially with the color red! I'm sad to say that after my friend washed this quilt, the red dye from the sashing fabric "ran" and turned the white fabric pink!

Close-Up of Peanuts-Themed Fabrics
I do like this pattern, though.  This quilt can be made with an unlimited number of themes.  All you have to do is change the fabrics you use for the star centers.  It's really only limited by your imagination (and fabric availability, of course!).

Thursday, May 19, 2011

Caroline's Animal Quilt


Here is the quilt I made for my daughter's arrival.  As with our first, we did not know ahead of time whether she was going to be a boy or a girl, so I had to design something that was gender-neutral.


I drafted this up on graph paper first (I still didn't have Electric Quilt at this time). I started it in the spring 2008 and finished it, like James' quilt, a day or two before she was born. I machine pieced all the squares, triangles, and borders. The animals are all hand appliqued, and I did hand quilting on this as well.

To do the animals, I first made a list of ideas, then I started searching through all my quilting books and magazines. For animals I couldn't find a good pattern for, I used the Internet to find pictures that I could make work. I used my copier to get the animals to the correct size for the quilt.
I'm pretty sure I didn't purchase any fabric specifically for this quilt either. I just made do with what I already had. I DID purchase the solid red and the backing fabric.

Thursday, May 12, 2011

View from the Cabin

View from the Cabin, 2006

This hangs in our living room and I love this quilt!   I made this in 2006 as a wedding gift to my husband, Brandon (although I didn't actually finish it until Nov. that year -- we were married in July).  This is my own design, depicting the view from our cabin at Jack's Lake in Canada.  That is me and Brandon kayaking in the sunset.  The quilt is hand appliqued.  The trees, figures, paddles, and loon are all hand embroidered.  The clouds and water are hand quilted.  The only machine work was attaching the borders and part of the binding.  This quilt is approximately 23" x 22".

Pink & Green Stars

Pink & Green Stars, 2005

For a long time before making this quilt, I had wanted to make a pink and green quilt -- so here is what I created -- the Pink & Green Stars quilt!

I made this quilt for myself -- my own design.  It is machine pieced and hand quilted.  Each of the star blocks are 12" x 12". The overall size is 76 1/2" x 102" (approximately queen size).  This is pre-Electric Quilt era, so I painstakingly drafted this entire thing on graph paper -- made the first sketches during a faculty meeting at school (tsk, tsk)!  At the time I started this quilt, it was good "therapy" for me.  I think I started this in the summer of '03.   I remember working on the quilting at the lake my first year up there ('05).  So, I must have finished this in 2005 or 2006.  Of course, like most quilts in my house, I didn't make a label when I finished it.  I keep saying I'm going to go back and do that one of these days....but I never seem to get around to it!

Tuesday, May 10, 2011

Crazy Cats Quilt


This was a kit that I bought at a quilt show. It came with the pattern and all the fabric to make the quilt. These are hand-dyed fabrics. This quilt is approximately 29" x 24" and hangs in our upstairs hallway. I started this quilt in late 2001 or early 2002. I believe I finished it in 2003.

I used hand applique and embroidery, machine piecing, and hand quilting techniques as I made this quilt.


I just love the expressions on these cats' faces!

With the exception of the noses, anything you see here that is black is embroidery. The noses are made of black fabric and then appliqued on the cats' faces. I pretty much followed the pattern when making this quilt and didn't really alter anything about the cats or their expressions.

Thursday, April 28, 2011

Bunny Wall Hanging


I bought this pattern at a quilt show, back in the day when I actually had time to go to quilt shows!  The pattern is "Spring Bunnies" by Harbor View Quilt Designs.  I think I finished this quilt in late 2002, but I'm not 100% positive on that. I do know I started it before September, 2001. It now hangs in my daughter's bedroom.

The size of this quilt is about 28" x 28". This was the first time I tried foundation paper piecing (for the bunny bodies). The pattern I purchased came with the foundation paper all printed and ready to go. It's kind of a difficult method to describe.  If you'd like to know what it is and how to do it, here is a link to a great tutorial on foundation paper piecing.

In addition to foundation paper piecing, I also used regular machine piecing, hand applique (the hearts), and hand quilting.


If I recall correctly, I didn't purchase any of the fabrics for the bunnies' dresses or the plaid border/binding fabric. I think I purchased the yellow background and purple sashing though. I originally made more than nine bunny blocks so that I could "test drive" them to make sure I had the right combination of colors. I ended up w/ about four bunnies leftover which I later used to make a throw pillow for my niece. I think there was also a "boy" version of this bunny pattern.