Friday, April 29, 2011

Feeling Good

Feeling quite good today due to all the various tasks I've been able to complete.  Though my "To Do" list is never quite done, I've managed to do a few things on the list; and that always makes me feel pretty good.  We are having the best of what spring has to offer, as far as the weather goes.  I know this has a lot to do with my overall state-of-mind.

Here are some things I did today:

  • I washed our sheets and comforter (which I'm embarrassed to say how long it's been since I've washed THAT) and hung them out on the clothesline to dry.  
  • I also was able to vacuum out my car today, which included removing and cleaning two car seats and all the "gunk" in, under, and surrounding them.  I'm always amazed at the amount of food items I discover when cleaning out the car -- lots of stale "goldfish" crackers, raisins, fruit snacks, and even some gum!
  • I managed to fit in about 30 minutes of exercise -- about 10 minutes of weight lifting and about 20 minutes of cardio.  While exercising, I also finished watching "Dirty Dancing" which I haven't watched in years -- in fact, my copy is a VHS tape!
  • I completed a bunch of tutoring-related paperwork too.  Last night I completed all my tutoring hours and said good-bye to the family I have been working with since November.  They've been a good family to work with, and I hope I'll have a chance to work with them again next year.  I know some other tutors who haven't been so lucky.
  • I did some work on my hexagon quilt.  I'm currently making more muslin hexagons.  I'm getting near the end of that particular task.  I currently have 734 made out of a total 864 that I need -- coming down the home stretch!
  • In addition to all that, I took care of my 3 and 2 year old children, another 2 year old for 3 1/2 hours, and a K, 3rd and 5th grader after school for a few more hours.

All in all, I'd say it's been a pretty productive day!  I'm missing my husband though.  He worked all day and is now at a track meet that will keep him away from home until probably 10:00pm.  Once the last daycare child is picked up, I will be taking the kids and heading over to my in-laws for some take-out dinner.  I'm looking forward to some "adult" company this evening!

Thursday, April 28, 2011

Bunny Wall Hanging


I bought this pattern at a quilt show, back in the day when I actually had time to go to quilt shows!  The pattern is "Spring Bunnies" by Harbor View Quilt Designs.  I think I finished this quilt in late 2002, but I'm not 100% positive on that. I do know I started it before September, 2001. It now hangs in my daughter's bedroom.

The size of this quilt is about 28" x 28". This was the first time I tried foundation paper piecing (for the bunny bodies). The pattern I purchased came with the foundation paper all printed and ready to go. It's kind of a difficult method to describe.  If you'd like to know what it is and how to do it, here is a link to a great tutorial on foundation paper piecing.

In addition to foundation paper piecing, I also used regular machine piecing, hand applique (the hearts), and hand quilting.


If I recall correctly, I didn't purchase any of the fabrics for the bunnies' dresses or the plaid border/binding fabric. I think I purchased the yellow background and purple sashing though. I originally made more than nine bunny blocks so that I could "test drive" them to make sure I had the right combination of colors. I ended up w/ about four bunnies leftover which I later used to make a throw pillow for my niece. I think there was also a "boy" version of this bunny pattern.

Wednesday, April 27, 2011

Conflicted Feelings

 The following is an excerpt from the novel Circle of Quilters by Jennifer Chiaverini.  It is one of the books in her Elm Creek Quilts series.  I read all of these books in the summer of 2010.  When I read this passage, I really identified with the character of Karen and how she feels torn between the duties of motherhood and her own wants/desires.  Fortunately, my husband is A LOT more understanding and appreciative than her husband, Nate, is.  But I still felt this passage worth sharing and reading again because it reminds me that I'm not the only stay-at-home mother who sometimes has such conflicting feelings.

**************************************************************

     "I'm sorry, honey."  Nate wrapped her in a hug, and she rested her head on his chest.  "I know you really wanted that job."
     "It's all right," said Karen, and she meant it.  In a way, it was even a relief.  she had no idea how she would have managed working outside the home and raising the boys without driving herself to the brink of exhaustion.
     "But I know how much it meant to you."  Nate hesitated.  "I know you want a paying job so that you can feel like you're doing something important."
     "That's not it."  Karen pulled away and picked up the knife, slicing Lucas's sandwich into squares and Ethan's into triangles, the way they preferred.  "I think that what I do now is important.  Not making sandwiches, but all of it.  What could be more important than raising my two children to be self-confident, compassionate, moral adults?  I just wish other people respected what I do.  I know I shouldn't care what other people think, but I wish other people thought that what I do is important."
     "And by 'other people,'" said Nate, "you mean me."
     She set the knife in the sink and tightened the lid on the strawberry jam jar.  "Yes, Nate.  I mean you."
     "I get it, " he said.  "I get it."
     She doubted he did.  If he did get it, if he really understood how she felt -- but how could she expect him to understand when she herself could barely sort out her conflicted feelings?  She loved her children dearly.  They were more precious to her than any job could ever be.  But one moment she felt utterly fulfilled by motherhood, and the next as if she were trapped, spent, finished.  Old and ugly, tired and used up.  She missed feeling special.  She missed that sense of anticipation that everything lay ahead of her, anything was possible, that she could do anything, be anything, be admired and cherished and beloved.  She missed feeling wanted for herself, for the woman she was and not merely the housekeeping chores she performed.  At the same time, she knew that taking care of her children was her duty and her calling and whatever she did or failed to do in the boys' early years would affect them so profoundly that nothing else she ever did would leave such a mark on the world.  She was angry that no one appreciated the importance of the task appointed to her and ashamed that she wished she could escape its drudgery.  She felt both taken for granted and selfish.  She was ashamed that she could not simply enjoy her beautiful sons, children any parent would be grateful to have, and that what seemed to come so naturally to other women was a continuous uphill struggle for her.  She felt like a failure, hopelessly inadequate to a task that was far too important to entrust to anyone else.

****************************************************************

Monday, April 25, 2011

Beautiful Moments

It finally feels like spring is really here.  There's just this change that seems to take place once the outside temperature reaches above 68.  Add a little sunshine, and, for me, it is transformative!  The grass is green, the leaves on the trees are ready to burst, the daffodils are in bloom, and the birds are singing.

Yesterday morning my husband and I took our children for a walk at a nature preserve that we visit frequently.  It's a beautiful place -- with all different types of environments for the kids to be surrounded by and observe.  It is even more magical at this time of year, when we can see the world coming alive again before our very eyes.  And there, for the first time, our children held hands while walking along the path.  Our daughter called out to her big brother "hold hands!" and put her hand in his.  He readily obliged.  How I wished I had my camera to capture that moment forever!

Here are a few pictures of a time when I DID have my camera along with us.  This was back last June (2010).  My, how they've grown since then!


Saturday, April 23, 2011

Hexagon Progress

The following shows the progress I had made (as of January 3, 2011) on my hexagon quilt project which I began in March, 2010.  If you're interested in the process of how I am making this quilt, click here:  Janine's Hexagon Tutorial 


So, this here gives you an idea of how the overall quilt is going to look.


My hexies! Each colored stack is 30 hexagons and each muslin stack is 24.  I have made 454 muslin hexagons and 294 colored ones.


In case you're curious....I need a total of 2036 hexagons to make the quilt. At this point, I had made 868. Only 1182 left to go!


Here it all is! Nine months worth of work! If I continue at this pace, it should take another 1 - 1 1/2 years to piece the whole top. THEN I will be able to start the quilting. Ya, it's gonna be a while before this is done!


Here's what it looks like after my 2 year old gets into my hexagon box!

*************************************************************************

The following is a progress update.  This is what I completed by the end of March, 2011:


It is now the last day of March, and I have completed piecing all the flower units! There are 75 all together. I actually only need 72, so I have a few extras to work with.


Here they all are stacked up!


I just love all this color!


My next challenge is to figure out my color layout. I need to play around with these, arranging them so that I don't end up with a whole lot of one color right near each other. I realized that pinks and blues are the most dominant colors, so I need to space them evenly throughout the quilt.


I've organized the layout! Now I just have to make 359 more muslin hexagons and 621 more solid green ones before I can piece this whole thing together!

Check back for more updates in the future!

Latest update:
Check my post from April, 24 2012 to see how this is progressing one year later....

Freedom Lost?

No matter how much "me" time I manage to carve out of a day, it never feels like enough.  There are times when fulfilling my roles of wife and mother just feels like too much, and I sometimes long to get those "good old days" back -- the days when I lived alone, before I became a mother, before I had to worry about anyone else's needs but my own.  And it's not because I am unhappy in my life now or that I wish I could do things over and change my life.  It's not because I don't love my husband and children.  It has nothing to do with those things, but it has everything to do with a loss of freedom.

I miss the freedom I once enjoyed.  Back in the days when I lived alone, I had the freedom to do pretty much what I wanted, whenever I wanted, without having to bother with anyone else's needs or agenda.  I could decide to go shopping at 2:00 in the afternoon and not come home until 10:00pm, picking up dinner at a drive-thru at some point along the way.  Now, on the off-chance that I can even GO shopping by myself, the entire time I am plagued by this nagging feeling that the clock is ticking.  And I have to say, this feeling has ruined many an outing for me.  All the while in the back of my mind thoughts are floating around -- I need to make this quick -- I need to get back soon -- My husband is probably wondering when I'll be back.  Mind you, he RARELY calls me on my cell phone while I'm out, and he typically doesn't ask "what took you so long?" when I return -- even though I know he is sometimes thinking it.

I also don't have the freedom to be alone whenever I want.  When I lived alone there were times I would come home from school on Friday afternoon and not leave the house again until Monday morning when it was time to go back to work.  I know some people might think that sounds crazy, but I have to admit that it's true.  I guess, for me, the way I mentally and emotionally recharge is by spending time alone -- away from noise, distractions, and, yes, people.  What did I do with all that time alone, you ask?  Didn't I get bored?  My answer is, absolutely not!  I've always had a talent for self-entertainment, so-to-speak.  I would read books and magazines, watch t.v., quilt, mow the lawn, do some gardening, or work on home improvement projects.  There was always something to do to fill the time.  What a luxury it was to wake up in the morning and decide how I wanted to spend my day!

"Home" from 2001 - 2007

Of course, life wasn't always fun and games back then.  Sometimes I had homework to do -- either from a grad class or from school, and that did put a damper on things.  Come to think of it, maybe it wasn't all sunshine and daisies back then.  Were the "good old days" really as good as I remember?  The mind is a tricky thing.  It's true that I did have a lot more time to myself back then; but there were also times when I was deeply lonely and depressed.  I did have a lot of freedom to choose what, when, and how I did things.  But, at the end of the day, except for the company of a psychologically disturbed mutt, I was on my own -- on my own to do pretty much everything, which included paying for and maintaining a home.  I would be lying if I said it was not overwhelming at times.  If not for the emotional support of a few close friends, I don't know how I would have managed to get through that period of my life.

I guess we all have a tendency to remember things the way we want to -- the "rose-colored glasses syndrom" I suppose.  I loved having so much time to myself, but I was missing something back then too.

My Husband and Me (shortly after we met in 2005)

That "something" was the unconditional love and support of a life partner -- my wonderful husband.  Now, I no longer face the world alone.  He is my partner, my support, and my true love.  When he came into my life the darkness and despair I felt were lifted.  I felt happiness and joy in my life again -- and a different kind of freedom that comes from feeling loved -- and safe -- and secure.  From him, I learned what true love really is -- and I learned that I was worthy of it.

It's true that becoming a wife, and now a mother, has cost me some of the freedom I used to enjoy -- but not ALL of it.  I still have SOME time to myself, thanks to daytime naps and a husband that understands my need for "alone" time.  And although these brief moments never feel like enough, I know that I wouldn't trade my life now for anything more.  For I know this state of being is not permanent, and that as my children grow and become more independent, I will regain more and more of that freedom I have lost.  I am now blessed with an incredible husband, two beautiful and healthy children, good food to eat, and a home in which to enjoy our lives together.  And, really, what more could I ask for?
"My Family" October, 2010

Sunday, April 17, 2011

Parenting Resolutions

Admittedly, I am a fan of family psychologist John Rosemond and read his weekly column with regularity.  I have read several of his books and attended one of his parenting seminars when he came to Connecticut last fall.  Although I don't always agree with his opinions/advice 100%, I usually find myself mostly in agreement with his parenting philosophy and ideas.  If you are not familiar with him, he is very traditional in his views on families and the rearing of children.  He is a huge advocate of plain old fashioned common sense when it comes to parenting.  I'd like to share here his list of resolutions for parents that I came across at the beginning of the year.

Here is John Rosemond's list of "Resolutions for Parents":

1.  We will not throw expensive "event parties" for our children on their birthdays.  Instead, we will confine all birthday celebrations to our family, including extended family.  We will keep it uncomplicated:  a special dinner of the birthday boy or girl's favorite food, a cake, the obligatory song, and a few simple gifts.  Mostly clothing or other useful things.

2.  We will spend at least as much time helping our children develop good manners as we do helping them get good grades in school, which means we will cut back significantly on the time helping with the latter (in consideration of the fact that good manners, which are expressions of respect for others, will take one further in life than will good grades).  Each week, we will work on one specific social courtesy, such as saying "excuse me" when you walk in front of someone.  Taking two weeks off, that's 50 courtesies a year!

3.  We will show our love for our neighbors by properly disciplining our children, insisting on proper behavior, and reprimanding immediately (even if that means in front of other people) when they behave otherwise, and on those occasions we will also insist they apologize appropriately.

Thursday, April 14, 2011

Nine-Patch & Hourglass


This quilt hangs on the wall in our kitchen and is another one of my favorites! From the moment I saw this design in a quilting book, I knew I wanted to make it. I bought the entire book just for the pattern to make this one! The name of the pattern is "Nine Patch & Hourglass" (I'll explain why later). I love the combination of the pieced center and the appliqued border.

I believe I started this around 2000 and finished it in 2002 (maybe early 2003). This quilt is approximately 56" x 56". I used machine piecing, hand applique, and hand quilting techniques in this one.

Tuesday, April 12, 2011

Hexagon Tutorial

Below is My Step-by-Step Guide to Beginning a Hexagon Quilt using the English Paper Piecing Method!

Before we start, I would just like to say that this is the particular method that I use.  There are many different variations on the English paper piecing method.  In some versions, the paper is left in the finished quilt.  Personally, it doesn't sit right with me to leave the papers in, so my method does involve removing the papers in the process.


Here's a picture of the end-project I am currently working on.  This is just to give an idea of what I'm making.  I have already made some changes to how the edges will look in the finished quilt, but this still gives you the overall idea.


Okay, so the first thing I do is print hexagon templates onto card stock. I use my EQ (Electric Quilt) program to do this. I can print hexagons in any size I want. Each side of these are 1 1/2" (1.5").  An 8.5" x 11" piece of card stock will yield 15 hexagons this size.

Next I cut out each hexagon and punch a small hole in the center of each one (you'll see why later).  I cut these out the old-fashioned way, with scissors.  Well, that's not entirely true.  I use a rotary cutter and ruler to cut these into five strips of three hexagons each.  I cut right on the lines of two edges (top and bottom).  Then I can stack the strips for easy storage and cut the individual hexagons out as I need them, or when I have time and want something to do with my hands -- like when watching t.v.


FYI:  Because of the number of templates I knew I would need, I chose to make my own, however, you CAN purchase ready-made hexagon templates.  They come in many different sizes.  The ones I have seen are made out of plastic.  You can also re-use these throughout the same project, so you don't necessarily have to make as many templates as there are hexagons in your finished project.


So, the next thing I do is pin each one of these hexagon templates to a piece of quilting fabric (100% cotton).  Then cut around the template leaving about 1/4 inch seam allowance all the way around.  If you've done much quilting, you should be pretty good at "eyeballing" 1/4"!

By the way, you can probably guess that this is a fantastic project for using up all those fabric scraps!


Next, I fold the seam allowance over the card stock template and baste it down with needle and thread. For the method I am using, it is important NOT to sew through the card stock. This is because you will need to "pop" the template out of the fabric later on.  If it is sewn in, you will have a very difficult time doing that!

In addition, you do not want these basting stitches to appear on the front of your hexagons.  With this method I am using, you will not have to remove any basting stitches later on.  You just leave them in and no one ever knows they're there!


When I am finished basting, this is what it looks like from the front.


So, here you have it in three steps:  Pin, Cut, & Baste.  Repeat this until you have the desired number of hexagons for your finished project.


Here are some completed hexagons.  The next step is to sew these little guys together.  This is done by hand, as you'll see in the next few photos.


A Word About Hand Sewing:
If you detest hand sewing, this project is NOT for you!  For me, that is one of the most enticing things about this project.  It not only forces you to slow down, it can be relaxing and helps you enjoy the process of creation.  Another plus is that it is very portable! As such, I can work on this just about anywhere, anytime, anyplace....and I just love that!


Okay, so you need some high quality sewing thread.  I used 100% cotton, but you can use whatever you prefer.  You could also use hand quilting thread.  One thing I find is very helpful is using a little beeswax to coat the thread before sewing hexagons together.

And I don't cut a very long piece of thread at all.  I usually cut a piece the length of my hand to my elbow -- that's it.  I find if it's any longer than that, it starts to fray and I have to dispose of it anyway before I can use the entire length.

I start by threading the needle (I use a quilter's between) and making a knot at one end.  Then I run it through my wheel of beeswax a couple of times.  Then I line up two hexagons (right sides facing) and start by inserting the needle through the right corner of both pieces.  Then I proceed to stitch from the right corner to the left corner.  I use a simple overcast stitch -- always coming into the fabric from the back with the needle.
You only need to "catch" a few threads of each fabric (See photos).  You don't want to sew through the card stock template.  I repeat, do NOT sew through the card stock!


 Two hexagons (or hexies) partially sewn together.


Once you have two sewn together, you add a third.  You do this by opening up the first two you sewed and then adding your third to one of them.  For the quilt I am working on here, I need to make 72 "flower" patches.  Each flower patch consists of 7 hexagons -- 1 center hexagon (mine are all yellow fabrics) and 6 "petals" (multicolored fabric scraps) that surround it.  I sew one petal to one center yellow.  Then I add the other five petals until all six sides of the center hexagon are sewn.


Here is another picture of a second "petal" hexagon being sewn to a yellow center hexagon.


Yellow center with two "petals" sewn on.  Here's how it looks (from the back) when you open it up.


And here is how it looks from the front. 


Here is a completed flower patch!

Once you have all six hexagons sewn to a center hexagon, you are ready to "pop" out the center hexagon's card stock template.  I use the blunt end of a wooden skewer to do this.  I insert it into the hole in the template and then pop the template out.  Keep your templates!  You can re-use them to make more hexagons!

Now, this is VERY IMPORTANT -- you ONLY pop out the template of the center hexagon.  The rule is:  You can only pop out a template if ALL SIX SIDES of the hexagon are sewn.  If you pop out templates before all six sides are sewn, you will have a very difficult time sewing your hexagons to one another.

With the card stock out of the center hexagon, you are now able to fold the flower unit in half to sew the sides of the petal hexagons to one another.


Here's another finished flower patch.


Here is how they appear from the back.  Notice that the center hexagon templates have been removed, but the six petal hexagon templates remain in place.


Here's a close-up of my stitching.  I sew pretty small stitches because I am thorough and I want this quilt to last!


For the quilt I am making, I am surrounding each flower with various muslin hexagons.  Again, one of my purposes is to use up a large stash of scraps!
So, I build around the flower petals in the same way that I built around the center hexagon.  I remove templates as I go.  Solid green hexagons will then be added to finish off the design.  Refer to my photograph at the beginning to see what the finished project is intended to look like.


Here's the back.  As each hexie is surrounded on all six sides with new hexies, the templates are popped out.


I began this project around March of 2010.  Here was my progress as of September 5, 2010.  I made a total of 13 flowers and sewn muslin hexagons around all but two of them.


All 13 flowers and all the hexagons I had made up to this point are in this picture.  As I have time, I will post updates as to how this quilt is coming along.  It's quite further along than this now!


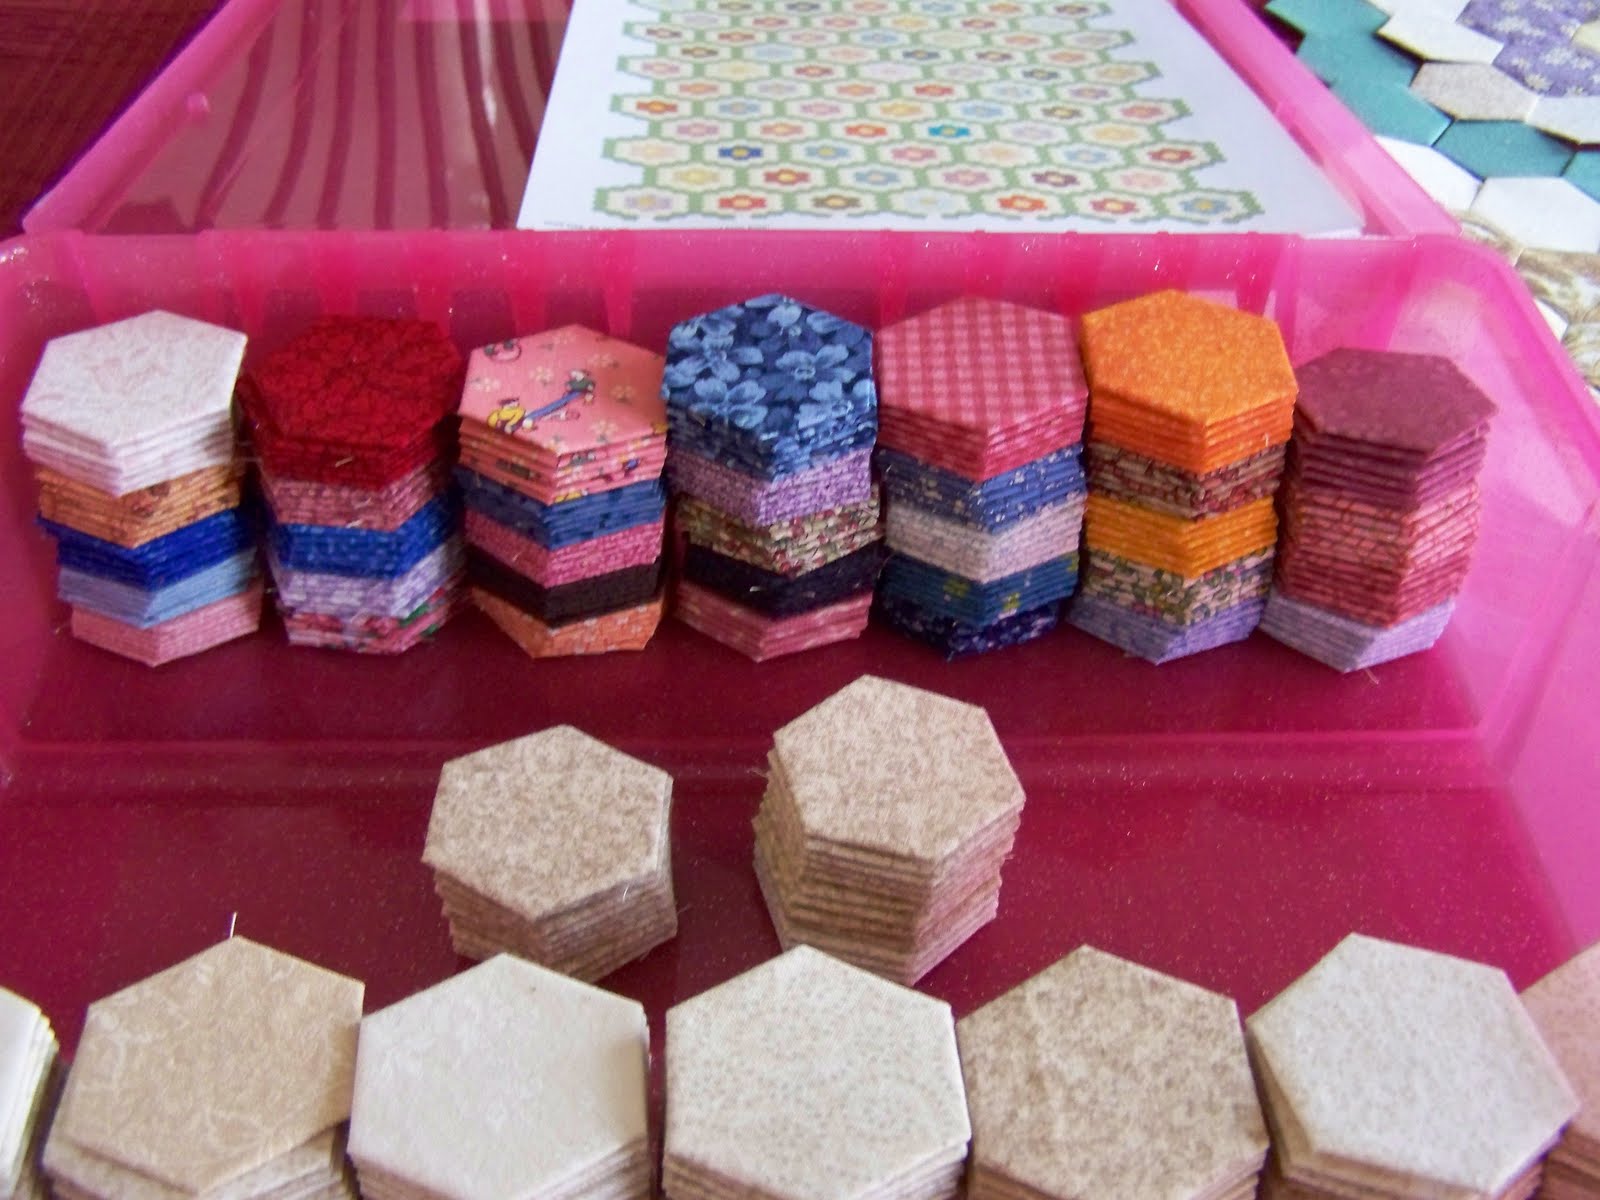
Yellow centers and flower petal hexagons ready to be sewn!

Muslin hexagons


My then 2 1/2 year old son playing with the hexagons!

Friday, April 8, 2011

James' ABC Quilt


Here is the quilt that I made for my son before he was born. I actually finished it the day before he was born. I think I knew he would wait to come into the world until his quilt was done!

The original pattern for this was actually meant to be a miniature quilt. From the time I purchased the book it is in, I planned that someday I would make it for my first child. Another reason this was a good choice was because we chose to wait to find out the baby's gender, so I thought this quilt would work for either a boy or a girl.

I took the letter patterns and enlarged them to the size I wanted on my copier. Each block is about 5 1/2" square. The entire quilt measures 38" x 45". In the original quilt, the letters are fused onto the fabric squares and then a blanket stitch is done around them to finish them off. I chose to use hand applique for my letters and fore-go the blanket stitch.

Wednesday, April 6, 2011

Doll Quilt & Daisy Wall Hanging

A Couple of Random Quilts I Made in the Early Days of My Quilting

Doll Quilt

Now, here is a nice little doll quilt that I made sometime after finishing my second quilt. I made three of these altogether. The first two were given to the little girls that I used to nanny. This one I kept for myself. The ones I gave the girls were much cuter and prettier than this one. I find this one kind of drab, especially that grey border.


Tuesday, April 5, 2011

The 1930's Quilt

My 1930's Quilt -- Made from Antique Quilt Blocks
I call this the 1930's quilt. I worked on this off and on for about 5 years -- from around 1995 - 2000. I purchased all these blocks already sewn from an antiques shop in Michigan. I paid $20 for 48 blocks, all made with fabrics from the 1930's. My mother and sister were with me when I bought them and didn't seem to understand why I wanted them. I remember sitting in the backseat counting them up and deciding right then and there to make a quilt that was 6 x 8 rows -- roughly the size of a twin-size bed quilt.

My Second Quilt


Now here is the second quilt I ever made. The construction of this quilt is pretty much exactly the same as the first one, so I won't bore you with repetition. The overall size of this quilt is bigger than the first one, although the squares are all the same size.

The biggest difference between this and the first would be the addition of a real border. It's puny by my standards now, but at least I started thinking about borders at this point.
I still didn't have a clue about value, contrast, and design, but at least I did try to balance out the visually "heavy" fabrics (ie the dark, solid fabrics).

My First Quilt

My First Quilt, 1989
Well, here it is! The very first quilt I ever made! I made this quilt in 1989 (at least, that's when I finished it). I don't remember exactly when I started it or how long it took.

I was inspired by a book I saw featured on the PBS show "Reading Rainbow." The title of the book is "The Patchwork Quilt" and it is a story about an African American girl and her family. Her grandmother lives with them and teaches her how to make a quilt using all sorts of scraps from their old clothes. It takes the little girl, her grandmother, and her mother an entire year to make the quilt. When it is done, the whole family reflects on the year gone by and the memories that each patch holds for each family member.

This is what sparked my interest and made me dig out a box of scrap fabrics and start sorting it out, cutting it up, and stitching it together.