Wednesday, January 25, 2012

Quilting 101 -- Lesson 6 -- Inner Border

Lesson 1 -- Choosing A Design
Lesson 2 -- Fabric
Lesson 3 -- Cutting Fabric
Lesson 4 -- Piecing
Lesson 5 -- Piecing the Blocks Together

It's now time to add the borders and complete your quilt top!


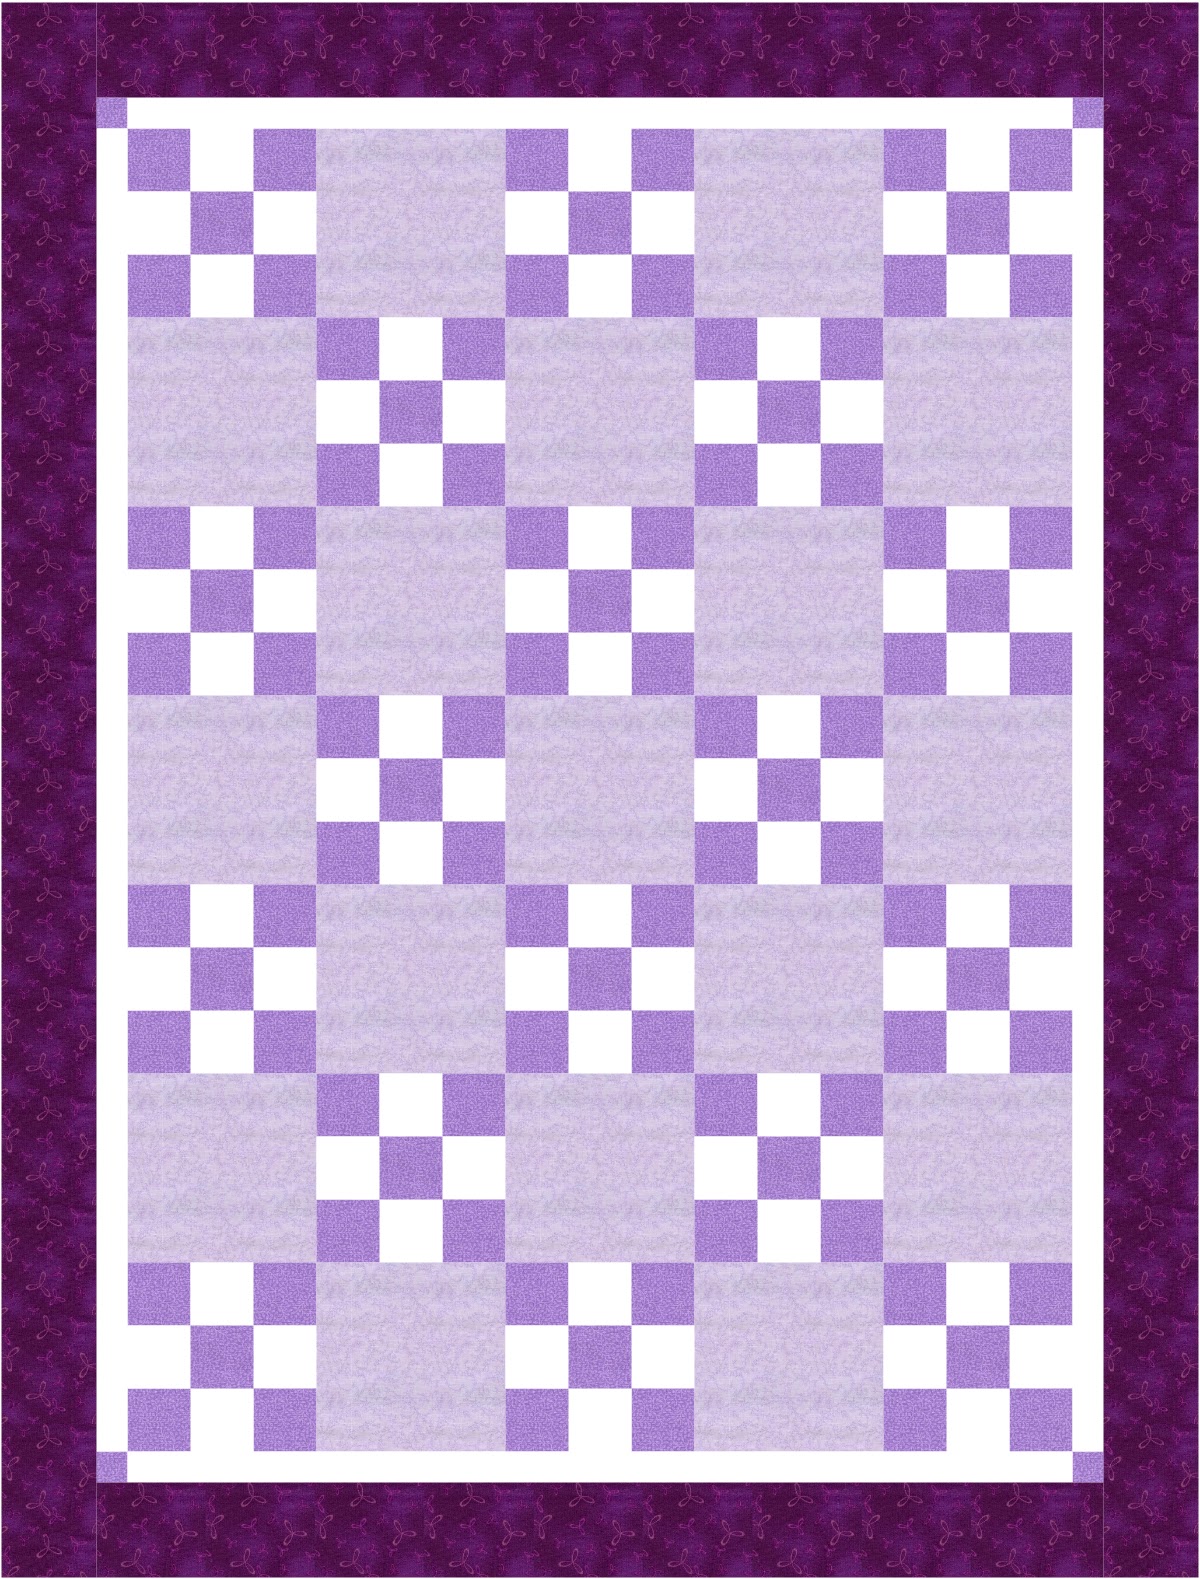
If you have not done so already, choose a fabric that you would like to use for your borders.  I have included two borders in my design -- a narrow inner border and a wider outer border.


"Audition" fabrics by laying them next to your quilt top.  Then take a step back to see how they look.  I actually did this step before sewing all the blocks together.


Once you have chosen your fabrics, cut the border strips.  Cut these in the same manner as you cut the strips for your pieced blocks.
The fold is along the bottom here.
Begin with a prewashed and ironed piece of fabric.  
Fold the fabric in half (matching selvage edges).  
Line the ruler up on the fold, cut a small strip off to square up the fabric, then measure and cut your strips.  For the inner border, cut the strips 1 3/4" wide.


Cut 4 strips -- one each for the top, sides, and bottom.  If you would like to add the corner blocks to the border (see quilt layout photo above), you will also need to cut 4 - 1 3/4" squares.  I used a yellow scrap piece of fabric that was leftover from the nine-patch blocks.


Lay out the strips with your quilt to make sure they are long enough.


Sew the side borders on first.  With right sides facing each other, pin one of the side borders to the quilt top.  Your border strip should be a little longer than your quilt.  Leave a little extra at each end.  You will trim it off evenly after attaching the border.  Sew the border to the quilt top using a 1/4" seam allowance.


Before pressing, lay the quilt facing down on your cutting surface, line up a ruler with the corner of the quilt, and trim the border to the exact length of your quilt.


Press the seam allowance toward the border fabric.

Repeat this process for the opposite side border.

If you are not sewing corner blocks, you can go ahead and sew the top and bottom borders on in the same manner as the sides.  Then skip ahead to Lesson 7 -- Outer Border.

If you are going to add the corner blocks to your inner border, follow these steps:
First square up one end of your top strip by lining up a ruler and trimming off a little bit.  Take one of the corner squares and, with right sides facing, lay it on top of the border strip being sure to line up the edges.  Sew the square to the strip with a 1/4" seam allowance.  Press the seam toward the border fabric.


Now take the border strip and lay it in position on your quilt, making sure to carefully line up the seams (see photo at right).


You are now going to line up the opposite end of the strip and trim it to the exact length you will need.
Be sure to measure accurately in this next step!  Line up the 1/4" line on the ruler with the seam from the side border.
Use a marking tool to draw a line on the top border along the edge of the ruler.  
Your top strip needs to be trimmed so that it is equal to the width of the quilt, plus 1/4" seam allowance because you will need that seam allowance to attach the other corner square.

Trim the strip by cutting it along the line you just drew.  Then sew the second corner square to the top border strip in the same manner as you did the first one.

Top left corner of quilt
With right sides facing and matching up the seams of the corner blocks with the seams of the side borders, sew the top border to the quilt.  
Press the seam toward the border fabric.


Top right corner of quil


Repeat these steps for the bottom border strip.

The inner border is now complete!  
In Lesson 7 we will add the outer border.
 

Sunday, January 22, 2012

12 Secrets Real Moms Know

12 Simple Secrets Real Moms Know:  Getting Back to Basics and Raising Happy Kids by Michele Borba, Ed.D.

I just finished reading this book today, and I think it is definitely a book worth sharing here.

The author begins the book by discussing what some of the problems are facing today's mothers.....

"Many moms today are suffering from what can only be described as a kind of frenzy -- an abnormally high level of busyness, tension, stress, speediness, anxiety, heightened awareness, and even panic.  Many moms can't get enough sleep; they can never keep up or do enough for their kids and are feeling guilty and inadequate about it.  They're overwhelmed trying to be Supermom, to fulfill the expectations placed on them.  They overcompensate by taking on more and more until you might as well admit that they're in a state of Motherhood Mania.....And is Motherhood Mania worth it?  Is it worth all the time and energy and money we're spending?  Do our kids really benefit from all these splendid extracurricular activities and stimulating experiences?"

According to author, Michele Borba, the answer is a resounding "No"....."All our obsessive and hyper mothering is not helping our kids become happy and mature young adults and may in fact be doing them more harm than good."

So, you may be wondering, what are the 12 simple secrets?

Although there is a good chance the 12 secrets may be nothing new to many parents, Michele Borba points out that many mothers today have forgotten these simple truths about parenting.  She urges all mothers to get back to what really matters and gives practical advice, activities, tips, and further reading suggestions to help you do it.

"12 Simple Secrets Real Moms Know"
  1. A mother who loves teaches worth.
  2. A mother who is firm and fair gives her children a moral code to live by
  3. A mother who listens shows her children they matter.
  4. A mother who is a good role model gives her children an example worth copying.
  5. A mother who teaches values inspires character.
  6. A mother who supports her children's strengths builds their confidence.
  7. A mother who encourages independence cultivates self-reliance.
  8. A mother who applauds effort nurtures perseverance.
  9. A mother who accepts her children's shortcomings nurtures resilience.
  10. A mother who takes time for her children helps them build strong relationships.
  11. A mother who laughs teaches joy.
  12. A mother who takes care of herself holds together her happy family.
 As a mother, I find that I am continually a "work in progress."  I find it helpful to have a list like this I can refer to when things get tough.  Most of all, it helps me to stay focused on what is REALLY important.

Saturday, January 21, 2012

Quilting 101 -- Lesson 5 -- Piecing the Blocks Together

Lesson 1 -- Choosing A Design
Lesson 2 -- Fabric
Lesson 3 -- Cutting Fabric
Lesson 4 -- Piecing

Now it's time to "play" with all those pretty blocks you made!  

Once you have finished piecing all 18 nine-patch blocks, lay them out on a table or clean floor with the plain blocks and decide how you would like
to arrange them.  

If you have several blocks that are similar in color, you want to pay particular attention to their placement.  Try to "balance" the color in your quilt by distributing similar blocks evenly throughout the quilt.  For example, note the placement of all the blue blocks in the photo here.  Also, take into account the color value of each block.  For example, if you have a few blocks that are lighter or darker than most of the other blocks, try to distribute those evenly as well.  This way, you won't end up with some areas looking too "heavy" or "light" in value.


Once you have determined your placement, you may want to take a photo.  This is especially helpful if you do not have a space to leave the blocks laid out where they will not be disturbed (like by children or a family pet!).
Sew the blocks into rows using a 1/4" seam allowance


The premise for sewing the blocks together is exactly the same as sewing together the nine-patch blocks.  Begin by sewing the blocks into rows.  Press the seams toward the plain block (in this case, the animal print blocks).

It is helpful to lay out your rows before you sew them together


Once all the blocks are sewed into rows, sew the rows together.


Remember to carefully match (and pin) the areas where there are intersecting seams!


When you have finished, lay out your quilt top and admire your work!


In Lesson 6 we will add the borders!

Wednesday, January 18, 2012

Quilting 101 -- Lesson 4 -- Piecing

Lesson 1 -- Choosing A Design
Lesson 2 -- Fabric
Lesson 3 -- Cutting Fabric

If you have made it this far in the quilting process, congratulations!  You are now ready to begin sewing your pieces together!

Before you begin piecing, you need to gather a few supplies -- a sewing machine, thread, an ironing board, an iron, and some pins.  Let's take a moment to talk about these supplies and a few of the basic techniques of piecing.

THREAD
It is best to use thread that is 100% cotton, however it is not absolutely necessary.  What you should NOT use is thread that is very old (ie grandma's old thread).  For more on the best thread to use for quilting, check out this page about thread.  
The color thread you use depends on the fabrics you are sewing.  I typically either use white or natural (light tan) colored thread when piecing.  For the most part, the thread will not be seen, so it is not necessary for it to match exactly.  What you want to stay away from is using a very light thread to piece dark fabrics or a very dark thread to piece very light fabrics.

SEWING MACHINE
Sewing machines can vary quite significantly in style and age.  You know your machine best.  Make sure your machine settings, tension, and needle are appropriate for the type of fabric you are sewing.  For information about sewing machine needles, check out this page about machine needles.  In addition, you should equip your machine with a 1/4" presser foot.


SEAM ALLOWANCE
As with cutting, accuracy is the name of the game when it comes to piecing.  Be sure you are sewing using a 1/4" seam allowance.  For more about accurate piecing techniques, I would highly recommend taking the time to check out this page about piecing accurately.

PRESSING
After you sew your fabric, you will need to press your seams with an iron.  It is very easy to stretch and distort your fabric by pressing incorrectly.  Here is a great page with tips on how to press seams.


So, now that you know the basics, let's get started piecing our quilt!
Start by laying out the nine squares for your first nine-patch block.  
Lay out the squares for your first nine-patch block as shown.
The technique is to first sew the blocks into horizontal rows and then sew the rows together to complete the block.  
Pick up the second square in the first row and flip it over (right side down) on top of the first square in that same row.  

Line up the edges and sew them together along the right side, using a 1/4" seam allowance.


After sewing, open the two-piece unit and put it face-up on your ironing board.  Using a pre-heated iron set to a cotton setting, press the seam toward the darker fabric (in this case, the blue fabric).


Repeat this process for the second and third rows.  Then lay the pieced units out as shown in the photo at left.


Now take the third square in each row and flip it over so the right side is facing down on top of the middle square.  Stitch each seam with a 1/4" seam allowance.  Press all seams toward the darker fabric.


Now you are ready to sew your rows together.  Lay them out in the order they will be in the block (see photo at left).


Pick up the top row and flip it face-down on top of the second row.  At this point, it is very important that you carefully line up the previously sewn seams.


If you did your pressing correctly, the seams should "nest" nicely, as shown in this photo.  Pin each seam after you check that it is lined up.


Use a 1/4" seam allowance to sew the rows together.


When you open the pieced unit, it should look like this.  Notice how all the corners of the squares meet up perfectly.  There is no overlap.
This is what you are striving for.
It may seem a little time consuming to line up each seam, but if you sew the rows together without doing this step, the squares in your block will not line up and will result in a "messy" and amateur looking block (in my opinion).


In the same manner as you just sewed rows 1 and 2, sew row 3 to row 2.

Congratulations!
You have just completed your first nine-patch block.  Way to go!


Now take it over to the ironing board and press it nice and flat.  

Press all the seams you just sewed in the same direction.  I pressed mine all going toward the bottom of the block.  It doesn't matter which way you choose.  Just be consistent with all your blocks.


One last step that I would recommend is to take the time to square-up your finished block.  A square ruler is very helpful for this task, but certainly not necessary.


If you look at the lines for 6 1/2" on this ruler, you will notice that the pieced block isn't perfectly square.  
The goal is to get the finished block to be as close to 6 1/2" as possible.


Use a rotary cutter to trim your blocks
You can see in this photo where some fabric needs to be trimmed off.  

The more accurately you can size your finished blocks, the more easily everything will fit together as you piece the top of your quilt.


Finished nine-patch block -- make 18 total for quilt top.
And here is how your finished block should look.

Repeat these steps to make all 18 nine-patch blocks.  

In Lesson 5, we will begin piecing the blocks into rows with the plain block squares to complete the quilt top.

Friday, January 13, 2012

Quilting 101 -- Lesson 3 -- Cutting Fabric

Welcome to Lesson 3 of my Quilting 101 series!  If you are just stumbling upon this post, you may want to check out Lesson 1 and/or Lesson 2 before continuing.

It is now time to talk about cutting your fabric.  A few tools can really come in handy and make this task a lot easier (and a lot more accurate).  There are a couple of different ways to go about cutting your fabric.  
Rotary Cutter, Ruler, & Cutting Mat

The most common method is to use a rotary cutter, ruler, and mat.  A rotary cutter is simply a disk-shaped razor blade (see picture at right).  It is sharp, fast, and can help you cut your pieces very accurately.  There are special rulers designed specifically for use with rotary cutters.  The mat is also designed for use with a rotary cutter and is essential if you do not want to ruin the surface on which you are cutting.  The rotary cutter's blade will also become dull rather quickly if you do not use a cutting mat.  Using a rotary cutter for the first time takes practice, but once you become accustomed to it, you will find that it is a very fast and accurate way to cut fabric.

The other common method (and some might say "the old-fashioned way") for cutting fabric is to use templates.  Templates can be made from paper, cardboard, or plastic.  There are actually sheets of plastic you can purchase for just this purpose.  The plastic comes in a few different thicknesses and can be easily drawn on with a permanent marker and cut by scissors.  Plastic templates are sturdier than cardboard or paper; and, therefore, are longer lasting.  If you don't want to make your own templates, you can also purchase pre-made plastic templates at a fabric store such as Jo-Ann Fabrics.  The downside to purchasing templates, is that you may not find the exact size/shape that you need.

When cutting fabric with templates, you simply place the template on your fabric, trace around it with some type of marking utensil (a sharpened pencil works just fine) and cut your fabric with scissors.  

A few words about scissors -- I would strongly recommend having a separate pair of shears for cutting fabric.  Paper and other materials can quickly dull your scissor blades, and dull scissors do not cut through fabric very well!  I actually have separate shears for cutting paper and scissors.  I used a permanent marker to write on the blades -- "fabric" and "paper" -- to remind myself, and others (like my husband) not to use them interchangeably.  My husband pokes a little fun at me about this, but at least I know I can count on my scissors cutting cleanly through fabric when I need them to!

One final note regarding the use of templates -- accuracy is very important in quilting!  I cannot stress this enough.  If you make your own templates, it is imperative that they are made accurately.  If your design calls for a 2 1/2" square, your template must measure exactly 2 1/2" square.  If just one side is slightly "off," it will affect your entire quilt.  Just a small error of 1/8 inch will have disastrous consequences.  That 1/8" will multiply itself with each piece you cut and sew -- to 1/4", then 3/8", and so on to 1/2" or more.  This will pose a huge problem because pieces that are supposed to be the same size will not fit together correctly.

No matter which cutting method you choose, when cutting fabric, the same rule applies as in woodworking -- measure twice, cut once!  Once you cut, it's a done deal, so remember to measure and cut accurately.

Okay, now on to our quilt project....

Since I prefer to use a rotary cutter, this is the method I will be demonstrating here.  After pre-washing and ironing your fabric, it's time to begin cutting.  Let's begin with the solid white fabric.  You will need to cut 72 - 2 1/2" squares (there are 18 nine-patch blocks, each needing 4 small white squares).

The bottom edge of the fabric is the fold
Begin by cutting the fabric into 2 1/2" wide strips.  Do this by first folding the fabric in half (matching the selvages).  It's important that your fold is straight.  You can use your rotary cutting ruler to check the alignment of your fold.  Line the ruler up with the edge of your fabric and trim off a little to square it up.  Then use that edge you just cut to line up the 2 1/2" line on the ruler and cut your strip.
Next, open the strip and cut it into 2 1/2" squares.  Repeat this process until you have 72 squares.

Always measure twice and cut once!
I should also make a note here about using a ruler and rotary cutter.  If you are right-handed, your left hand should be (firmly) holding down the ruler while your right hand is using the rotary cutter to cut the fabric.  Due to the fact that I don't have three hands, my left hand is not shown in the picture because I needed it to push the shutter on the camera!

Now that all your white squares are cut, you need to cut your colored squares.  If you are using fabric that you purchased, follow the same steps as you did for cutting the white squares -- prewash and iron, then cut a 2 1/2" strip, then cut the strip into squares.  
Some of my 2 1/2" squares for the nine-patch blocks

You will need 5 - 2 1/2" colored squares for each of the 18 nine-patch blocks, for a total of 90.  I used scraps from my stash for these squares, so I just went through the box and chose fabrics that I thought would look nice with the animal print.


Next you need to cut the plain block squares.  In our quilt, these squares need to be 6 1/2".  You would cut these in the same way you cut the 2 1/2" squares.  Fold your fabric in half with selvages lined up.  "Square up" your fabric, and then cut 6 1/2" wide strips.  
Cut 17 - 6 1/2" squares
Open the strips and cut them into 6 1/2" squares.  Depending on how wide your ruler is, you may find it necessary to use the grid lines on your cutting mat to measure a 6 1/2" wide strip.  Many rulers are only 6" wide.  Simply line the cut edge of the fabric up with one of the lines on the cutting mat grid.  Then you can slide the ruler over the additional 1/2" (by lining it up with the lines on the grid).

Congratulations!  You now have cut enough fabric to get started sewing!  You will still need to cut the border fabric, backing, and binding, but this is enough for you to move on Lesson 4 -- Piecing!  Get your sewing machine ready.....

Tuesday, January 10, 2012

Quilting 101 -- Lesson 2 -- Fabric

If you have already read Lesson 1, you are now ready to begin thinking about fabric!  To me, this is one of the fun parts of the process.  For some, it is one of the most daunting.  It can be very overwhelming, especially at first, going into a fabric store and trying to choose the "perfect" fabrics for a quilt.  It helps to know some basics.

First, look for fabrics that are 100% cotton.  All your fabrics need to be similar weight as well.  You don't want one fabric to be fleece and another flannel and yet another cotton.  At some point, you may want to experiment with combining different types of fabrics, but in the beginning, you want to avoid making things more difficult for yourself.  Keep it simple and stick to the fabrics designed specifically for quilting.


Now for the colors!  For reference, here is the black and white version of our quilt again. Below, I have shared some ideas for different color combinations you might want to try!


The most simple would be to choose a monochromatic color scheme.  This is very easy.  Keep in mind that it is important to think about color value when choosing your fabrics.  Think in terms of light, medium, and dark.  If you choose some of each, you will most likely end up with something that looks good.


If you'd like to add a bit more color, try choosing two colors.  Again, remember to include light, medium and dark fabrics.  I should also point out here that one fabric can be more than one value, depending on the other fabrics in the quilt.  It all depends on its value in relation to the other fabrics in the quilt.  For example, a fabric might be "medium" in one quilt, but "light" in another that has a lot of dark fabrics.


And if you aren't afraid to try lots of different fabrics, something like this might appeal to you.  This has a "scrappy" look and is one of my favorites!  Once you have been quilting for a while, you will amass quite a pile of scraps.  A quilt like this is a great way to use some of them up!
A smart way to make a quilt like this would be to choose the multicolored print first (that's the fabric in the plain block squares).  Once you have that chosen, you can base all your other fabric choices on the colors in that fabric.


Now let's look at some of the actual fabrics I have chosen for my quilt.  I started with this adorable fabric for the plain blocks.


Next, I started "auditioning" fabrics from my scrap box.  I made a few nine-patch blocks to start.  Then I tried lots of different fabrics by laying them next to the animal print.  

These are the 18 fabrics I decided would look best with the animal print blocks.  
What I actually did here was decide on several different colors -- green, blue, purple, and yellow.  Then I divided the number of nine-patch blocks (18) by the number of colors (4) to determine that I should have about 4 different prints in each color.  This is a good way to make sure the colors are "balanced."  In other words, I did this to prevent ending up with one color dominating the quilt.

Now, how do you know how much fabric you need to buy?  Well, that can be tough at first, but it's not that difficult.  First, determine what you need to cut for your quilt.  As discussed in Lesson 1, for this quilt you will need 17 - 6 1/2" squares for the plain blocks.  Quilting fabric typically comes 42" wide, and one yard is 36" long (remember what I said about math in Lesson 1?).  

If you cut strips that are 6 1/2" wide and then cut those into 6 1/2" squares, one strip that is approximately 42" long, should yield 6 squares (6.5 x 6 = 39).  Now, you need 17 squares, so you'll need to cut 3 - 6 1/2" wide strips.  Finally, determine how many inches of fabric you will need to get those 3 strips -- in this case, 6.5" x 3 = 19.5" which is more than a 1/2 yard (18") and less than 3/4 yard (27").  In the middle would be 2/3 yard which is about 24 inches.  

So, 2/3 yard would be enough for your plain block squares.  I typically purchase a little more in case I make a few mistakes (either in my math or when cutting the fabric).  I actually bought 3/4 yard of that animal print.

Also, some quilters, myself included, prewash and preshrink all their fabric.  Buying a little extra also takes this into account.

To summarize, all you need to know is a few key measurements (the width of your fabric, what size squares you need, and how many of them you need) to figure out your yardage.  Make a little diagram of the fabric (if that helps you) to figure out how many squares you can get out of one strip, figure out how many strips you need, and then how many yards of fabric will yield that many strips.

For our quilt, here is a list of what you will need:

1 yard of solid white (nine-patch blocks and inner border)
2/3 yard animal print (plain blocks)
18 (2 1/2" x 20") strips colorful prints for nine-patch blocks, plus some scraps for 4 (1 1/2") inner border setting squares
1/2 yard fabric for outer border
3/8 yard fabric for binding
1 1/2 yards fabric for backing
You will also need a package of crib-size batting

In Lesson 3 we will start cutting the fabric!  Sharpen your scissors!

Monday, January 9, 2012

Quilting 101 -- Lesson 1 -- Choosing a Design

I recently decided that I would like to do a series of blog posts that would include step-by-step instructions on how to make a quilt.  Maybe this will inspire some of you to make that first quilt you have been dreaming about but weren't exactly sure how to begin!  Let's get started....


The first thing you need to do is choose (or create) a design.  For a first quilt, I would strongly recommend a very simple design -- such as a quilt that is mainly squares.  Once you learn the basic techniques, you can branch out into using triangles and other more challenging shapes/designs.  You can find ideas in quilt magazines and books.  You can also do an Internet search to look for pictures of quilts that you like.  

A good idea is to start a collection of pictures of the quilts that you come across that you really love -- no matter how difficult the design appears.  I do this by tearing pages out of magazines and catalogs and then organizing them in a binder with sheet protectors.  Later, having this reference can really come in handy as you think about color combinations and fabric selection.  It can be very overwhelming at first, so having a collection of pictures can help you pinpoint exactly what styles and color combinations you are drawn to.

I have chosen a very simple nine-patch block for this tutorial.  The design below shows you what the finished quilt will look like.  (I am purposely leaving the color out of this diagram, so you can try and visualize your own color combinations when you look at this).

So, what you  need to be able to do when making a quilt is to "see" how it is broken up into its smaller components and then put back together into the whole.  A "block" is the name for the pieced units that are put together to form the top of the quilt.  The quilt above is comprised of 35 blocks -- the nine-patch blocks (18) and the plain blocks (17).  The plain blocks are simply the larger white squares.  They are not pieced.  They are just cut from a single piece of fabric.  You can't get much easier than that!

The nine-patch blocks are the ones that look like this:

Each one of these is made up of nine smaller squares sewn together into one larger square that is the same size as the plain block square.

Now, I hate to disappoint those of you that dislike math, but I must disclose the fact that there is no way you are going to get around doing some math when it comes to quilting.  It's simply a fact of life for us quilters.  The good news is that the simpler the design, the simpler the math will be too.

One basic thing you need to know about piecing a quilt is the standard seam allowance -- 1/4".  What this means is that you must factor this into account when determining the size you will need to cut your pieces of fabric.  How do you do that?

First, determine what size you would like your finished blocks to be.  This is typically based on what size you want the finished quilt to be -- whether you want it crib-sized, king-sized, or somewhere in between.  The quilt we are going to make will be approximately 38" x 50" -- the perfect size for a baby quilt!  Each block needs to be 6" when finished, so we need to add the seam allowance to that number.  Because we are working with squares, we must double the seam allowance (it will be needed on all four sides of the square).  This means that if you want a finished block of 6" square, you must cut the fabric 6 1/2" square.  Why?  Because you will lose 1/4" from EACH side as you sew your pieces together -- cutting the squares 6 1/2" factors in the seam allowance.

Now, that's fairly simple if you are just cutting a block from one piece of fabric, but what about when your block is pieced, as in the nine-patch blocks for our quilt?  First determine what size the finished block needs to be -- in our case that would be 6".  The nine-patch block is made up of 3 rows of 3 squares each.  So, divide 6" by 3 to get 2".  The finished size of your smaller squares will be 2".  So, what size do you need to cut those squares?  They need to be cut 2 1/2".
To summarize all of this -- you will need to cut 17 squares that are 6 1/2" and 162 squares that are 2 1/2".


So, now you know some basics about getting started.  But, what about the fabric?  How much do you need?  What kind of fabric works best?  What colors should it be?  I will address all of these questions and more in Lesson 2.

Friday, January 6, 2012

Advent Calendar: Early or Late?


Depending on how you look at this, I am either very late or extremely early.  I just finished making an Advent calendar for my family.  I found this idea Thanksgiving weekend, but I pretty much knew from the start, that there was no way I would have the time to put it all together by December 1st.  So, I went ahead and began the project anyway in the hope that I could at least work on it while the Christmas spirit was still in our house and then tuck it away with the holiday decorations for next year (which, incidentally, is now THIS year).


I can't wait to fill these little pockets full of surprises for my little ones!  By the way, these pockets are just the right size for a Ghirardelli chocolate square!  I think some round peppermint candies would also fit in them nicely.  

Another idea that I really like is to put notes in some (or maybe all) of the pockets.  Each note can have an idea of a Christmas-related activity to complete as a family -- such as bake cookies, make holiday greeting cards, or go look at Christmas lights, etc.  At the bottom of this post, I have included a list of web sites I came across that have ideas to use just for this purpose.  Next Christmas should be lots of fun!

I already took down our Christmas decorations from the mantle, but you at least get the idea here.

And, if you're interested, here is another Advent calendar idea that I contemplated making.  It's a Christmas tree design with pockets underneath the tree.  Really sweet!

Web pages with more Advent calendar ideas to inspire you:

Code Name: Mama
Skip to My Lou
Secret Mommy